The automatic installation of a plugin is easy and straightforward. However, you can also install it manually. It will involve manually downloading a plugin, uploading, and activating it.
Make sure you have already downloaded a zip file of the plugin to your desktop.
1. Log in to the WordPress dashboard.
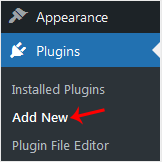
2. From the Dashboard menu, go to Plugins and click on Add New.
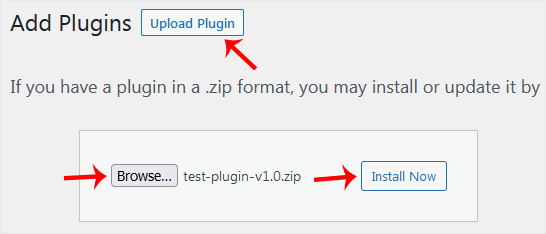
3. Click on Upload Plugin and then on Browse. Choose your plugin's zip file and click Install Now.
4. Click on Activate Plugin.
Note: After activating a plugin, a new menu of that plugin is added to the Dashboard menu.
- Kundencenter Home
-
Shop
- Alle anzeigen
- Plesk Hosting
- cPanel Hosting
- Advance Server
- Eco Sys Server
- Scale Server
- Domain Whois Lookup
- High Grade Server
- Rise Server
- Value VPS
- Essential VPS
- Comfort VPS
- Neue Server
- Elite VPS
- Game Server
- Storage Server
- Eco Ks Server
- SSL-Zertifikate
- 360 Monitoring
- NordVPN
- Email Spam Filtering
- XOVI NOW
- OpenXchange
- Site Builder
- Marketgoo
- CodeGuard
- SiteLock
- Weebly Website Builder
- Whmcs Module und Addons
- CloudVPS
- WhatsApp24 API
- Support - Hands on
- cPanel Lizenzen
- Plesk Lizenzen
- Shared Directadmin Lizenzen
- Shared Virtualizor Lizenz
- Shared Cloudlinux Lizenzen
- Addon Lizenzen
- Shared Litespeed Lizenzen
- Shared SolusVM Lizenzen
- CWP
- DigiCert SSL Certificates
- GeoTrust SSL Certificates
- RapidSSL SSL Certificates
- Sectigo SSL Certificates
- thawte SSL Certificates
- Trustwave SSL Certificates
- ownCloud
- Web-Push
- Whatsapp24
- SSL-Zertifikate
- Website- und Server-Monitoring
- VPN
- Email-Services
- XOVI JETZT
- Professionelle E-Mail
- Webseitenersteller
- SEO-Tools
- Website-Backup
- Websitesicherheit
- Website-Builder
- Ankündigungen
- Wissensdatenbank
- Netzwerkstatus
- Partner
- Kontaktieren Sie uns
- jetzt chatten
- Report Abuse
-
Mehr

